
Tests
Companion for Delivery tests
To use Companion for Delivery unit test, you need to configure your Maven Project like it is explained in section: Devops -> Maven configuration -> Companion for Delivery tests
With Companion for Delivery, a unit test is divided into 2 files:
- Java file
- Contains annotation specific to Companion for Delivery used to configure your unit test
.spec.jsfile- Based on Jasmine 2.3 framework (check documentation for more information here).
- Contains the JavaScript code executed in your STEP environment
Companion for Delivery have two executions mode :
- Companion Tests executor : Tests default execution mode. All modifications made within tests are persisted on Step instance, you may have to clean them at the end of your tests
- Step Javascript test API executor : Execution mode with
@Rollbackannotation. All modifications made within tests are cancelled on Step instance, but you must have configuration management Step component installed on your instance
Before we start
In the folder src/test:
- Create a new folder named
resources
Best practices
Feel free to create a full and clear package hierarchy
step-integration/
├─── src/
│    ├─── main/step/
│    │    └─── com/step/companion/
│    │         └─── Dummy.companion.xml
│    └─── test/
│         ├─── java/
│         │    └─── integrationtests/
│         │         └─── com/step/companion/
│         │              └─── DummyTest.java
│         └─── resources/
│              └─── integrationtests/
│                   └─── com/step/companion/
│                        └─── DummyTest.spec.js
└─── pom.xml
Java file
Create a new java class in the src/test/java folder.
See below example for a test named DummyTest in the package integrationtests.com.step.companion.
package integrationtests.com.step.companion;

import fr.cantor.c4d.sunit.annotations.JSTestFile;
import fr.cantor.c4d.sunit.runners.CompanionJUnitRunner;
import org.junit.Ignore;
import org.junit.runner.RunWith;

@RunWith(CompanionJUnitRunner.class)
@JSTestFile(js = "/integrationtests/com/step/companion/DummyTest.spec.js")
public class DummyTest
{
}
The file named DummyTest.spec.js with a relative path from src/test/resources (we will create this file in the next chapter) is the JavaScript implementation of the test.
This example shows the minimal requirements for a simple test. Companion for Delivery allows to add some customization to this java class using annotations.
Include Business Rules
In order to test a business rule (Action, Condition or Function), you need to include the target .companion.xml file into your unit test.
You can do this by using the following annotations:
@BusinessRules({
   @BusinessRule(id="BA0040", xml = "/com/step/companion/Dummy.companion.xml", aliases="executeDummyActionOrCondition")
})
TIP
Path to .companion.xml file is relative from src/main/step.
In order to test a local business rule, specify the path to workflow .companion.xml file.
Multiple Javascript plugins and Error Messages
If your business rule contains multiple Javascript modules, you should define multiple aliases : aliases= {"executeDummyActionOrCondition_AppliesIf", "executeDummyActionOrCondition"}.
Business rules plugins are taken in the order they appear in the .companion.xml file referenced.
In order to test a business condition that uses error message template, you can test its equality with the variable key or message. Other variable added to the message can be tested in the same way.
This business rule :
// testMsg is configured like this
// <LocalizableMessageTemplate Key="testMsg" Message="This is a test {myVariable}"></LocalizableMessageTemplate>

var error = new testMsg();
error.myVariable = "Variable";

return error;
Can be tested like this :
it('should work', function () {
    var res = TestBC();
    expect(res.key).toBe("testMsg");
    expect(res.message).toBe("This is a test {myVariable}");
    expect(res.myVariable).toBe("Variable");
});
If your business rule is an action or a condition you will now be able to call it by using the alias in the .spec.js file as
it("Should call dummy business rule ", function () {
    executeDummyActionOrCondition(node,manager);
});
Otherwise, if your business rule is a function you will now be able to call it by using the alias. Unlike business action or condition, you need to separate global bindings from function bindings in the .spec.js file as
it("Should call dummy business function", function () {
    const functionWithGlobalBindings = instantiateDummyBusinessFunction(manager, logger); // instantiate function from global binds
    functionWithGlobalBindings(node); //call business function that take a node as input
    //you can also use with this syntax directly
    instantiateDummyBusinessFunction(manager, logger)(node);
});
Library dependencies
You can add dependencies to a STEP Library using the following annotations by two different way:
- The library is provided by Step Instance : only alias and id parameters are needed
@BusinessLibraries({
    @BusinessLibrary(alias = "myBusinessLibraryAlias", id = "myBusinessLibraryId")
})
- The library is provided by Companion project (means embedded into the test) : alias, id and xml parameters are needed
@BusinessLibraries({
    @BusinessLibrary(alias = "myBusinessLibraryAlias", id = "myBusinessLibraryId", xml="/com/step/companion/myBusinessLibrary.companion.xml")
})
TIP
Path to .companion.xml file is relative from src/main/step.
In order to test a business library of your project, specify the path to workflow .companion.xml file.
WARNING
Do not use same library with different aliases or different libraries with the same alias.
Include files
You can include one or more files using the following annotations:
@Includes({
    @Include(js = "/integrationtests/TestSpecHelpers.js")
})
TIP
Path to .js file is relative from src/test/resources.
Rollback
In order to rollback changes made by your tests, you can use the following annotation :
@Rollback
WARNING
The rollback is made at the end of test execution (Java file), not between each it
The annotation has some restrictions :
- It can only be used with Step environment where the configuration management Step component is installed
- You cannot add dependencies to libraries provided by Step. All business rules dependencies must be provided by the companion project and their dependencies as well.
.spec.js file
After creating the Java file, you have to create a new .spec.js file in the resources folder.
This file describes your unit test using the Framework Jasmine 2.3 (check documentation for more information here).
Nothing specific to Companion for Delivery here.
Parameterized tests
Introduced in version 5.4.0, parameterized tests facilitate the execution of tests with extensive datasets.
When conducting tests within Step using the Step JavaScript test API or the legacy Companion test executor, significant modifications to a test file may result in a transaction that is too large to handle efficiently. This can lead to excessively long test execution times or tests that never conclude within Step.
To address these issues, we have implemented the parameterized feature.
A parameterized test is typically divided into three files:
Java File: This file declares the tested business rules, includes necessary test files, and specifies the parameter test file for parameterized tests.
Test Execution File: In this file, you execute the tests and handle the testing and Step logic. It includes:
- jsParameter: This specifies the JavaScript file used to handle parameterized tests.
- jsParameterArgs: This denotes the names of the arguments in the JavaScript test file.
Parameter Test File: Here, you specify the different test cases as data and pass them to the test logic for execution.
For exemple we want to test if a value is even or odd.
The provided example demonstrates the recommended approach for handling parameterized tests
Java File :
package fr.cantor.notebooks;


import fr.cantor.c4d.sunit.annotations.IncludeCompanionTestHelpers;
import fr.cantor.c4d.sunit.annotations.JSTestFile;
import fr.cantor.c4d.sunit.annotations.Rollback;
import fr.cantor.c4d.sunit.runners.CompanionJUnitRunner;
import org.junit.runner.RunWith;

@RunWith(CompanionJUnitRunner.class)
@JSTestFile(js = "/fr/cantor/notebooks/PairBatchedExempleTest.spec.js", jsParameter = "/fr/cantor/notebooks/PairBatchedExempleTest.testGenerator.js",  jsParameterArgs = {"testCases"})
@IncludeCompanionTestHelpers
@Rollback
public class PairBatchedExempleTest {
}
This file declares
/fr/cantor/notebooks/PairBatchedExempleTest.spec.jsas the testing file,/fr/cantor/notebooks/PairBatchedExempleTest.testGenerator.jsas the test data provider, and jsParameterArgs specifies the data binding in the test file.
Test Data Provider JavaScript File PairBatchedExempleTest.testGenerator.js:
var data = [
    {value: 1, isOdd: true},
    {value: 2, isOdd: false},
    {value: 3, isOdd: true},
    {value: 4, isOdd: false},
    {value: 5, isOdd: true},
    {value: 6, isOdd: false},
    {value: 7, isOdd: true},
    {value: 8, isOdd: false},
    {value: 9, isOdd: true},
    {value: 10, isOdd: false},
    {value: 11, isOdd: true},
    {value: 12, isOdd: false},
    {value: 13, isOdd: true},
    {value: 14, isOdd: false},
    {value: 15, isOdd: true},
    {value: 16, isOdd: false},
    {value: 17, isOdd: true},
    {value: 18, isOdd: false},
    {value: 19, isOdd: true},
    {value: 20, isOdd: false},
];

const batchSize = 10;
for(var i = 0; i < data.length;) {
    var nextI = i + batchSize;
    nextI = nextI < data.length ? nextI : data.length;
    PairBatchedExempleTest("Test case for " + i + " to " + nextI, data.slice(i, nextI));
    i = nextI;
}
In the provided file PairBatchedExempleTest.testGenerator.js, the test data is generated and passed to the test logic through serialization. `PairBatchedExempleTest refers to the name of the Java test file and is used as a function in this JavaScript file. The function takes multiple arguments:
- The first argument is always the name of the test.
- The subsequent arguments correspond to the bindings provided in
jsParameterArgsin the Java file.
Test Logic JavaScript File PairBatchedExempleTest.spec.js:
describe("Event/odd test", function (){
    beforeAll(function () {
        jasmine.addMatchers(companionTestMatchers)
    });

    testCases.forEach(function (testCase) {
        if(testCase.isOdd) {
            it(testCase.value + " to be Odd", function () {
                expect(testCase.value % 2).toBe(1);
            });
        } else {
            it(testCase.value + "to be Even", function () {
                expect(testCase.value % 2).toBe(0);
            });
        }
    })
} )
In the file PairBatchedExempleTest.spec.js, the test logic is implemented, wherein test cases are iterated through and assertions are made based on whether the value is even or odd. The values provided from PairBatchedExempleTest.testGenerator.js are passed through the testCases variable for processing within the test logic.
Use cases
Workflow tests
For this example, let's start with a simple 2 states workflow (initial and final) : SimpleWorkflow.
The Java test file: SimpleWorkflowTest.java
package integrationtests.com.step.companion.workflows;

import fr.cantor.c4d.sunit.annotations.JSTestFile;
import fr.cantor.c4d.sunit.runners.CompanionJUnitRunner;
import org.junit.runner.RunWith;

@RunWith(CompanionJUnitRunner.class)
@JSTestFile(js = "/integrationtests/com/step/companion/workflows/SimpleWorkflowTest.spec.js")
public class SimpleWorkflowTest
{
}
The .spec.js file: SimpleWorkflowTest.spec.js
Here we can test the two simple steps of the workflow, each step is inside a describe bloc, in which we run simple tests:
function createNode() {
    return manager
        .getProductHome()
        .getProductByID("PRODUCT_TEST_ROOT_ID")
        .createProduct(null, "PRODUCT_TYPE");
}

function deleteNode(node) {
    node.getWorkflowInstances().toArray().forEach(function (instance) {
        instance.delete("");
    });
    node.delete();
}

function expectToBeInState(node, state) {
    var isInState = node.getWorkflowInstanceByID(state.getWorkflow().getID()).getTask(state) != null;
    expect(isInState).toBeTruthy();
}

describe('SimpleWorkflow Test', function () {
    var workflow;
    var initialState;
    var finalState;

    beforeAll(function () {
        workflow = manager.getWorkflowHome().getWorkflowByID("SimpleWorkflow");
        initialState = workflow.getStateByID("InitialState");
        finalState = workflow.getStateByID("FinalState");
    });

    describe("InitialState", function () {
        var node;
        var task;

        beforeEach(function () {
            node = createNode();
            var instance = node.startWorkflowByID("SimpleWorkflow", "");
            task = instance.getTaskByID(initialState.getID());
        });

        afterEach(function () {
            deleteNode(node);
        });

        it("should be the initial state", function () {
            expectToBeInState(node, initialState);
        });

        it("should go to FinalState on continue", function () {
            var result = task.triggerByID("continue", "");
            expect(result.isRejectedByScript()).toBeFalsy();
            expectToBeInState(node, finalState);
        });
    });

    describe("FinalState", function () {
        var node;
        var task;

        beforeEach(function () {
            node = createNode();
            var instance = node.startWorkflowByID("SimpleWorkflow", "");
            instance.getTaskByID(initialState.getID()).triggerByID("continue", "");
            task = instance.getTaskByID(finalState.getID());
        });

        afterEach(function () {
            deleteNode(node);
        });

        it("should be in FinalState", function () {
            expectToBeInState(node, finalState);
        });
    });
});
TIP
Use the startWorkflowByID function to initiate a product in a workflow then the triggerByID function to move the product to the next state. This is useful to check that all paths in a workflow are correct.
Debugging
To help debugging tests, c4d provide a special binding debugLogger. This binding allows the test logs to be displayed in the c4d console.
Inside DummyTest.spec.js with Dummy businessAction as executeDummyActionOrCondition.
it("Should call dummy business rule ", function () {
    debugLogger.info("inside my unit test")
    executeDummyActionOrCondition(node, manager, debugLogger);
});
And Dummy businessAction
logger.info("inside my business rule");
Display the following logs inside the console
août 18, 2022 3:10:39 PM fr.cantor.c4d.sunit.jasmine.JasmineJavaReporter$Log log
INFOS: inside my unit test
août 18, 2022 3:10:39 PM fr.cantor.c4d.sunit.jasmine.JasmineJavaReporter$Log log
INFOS: inside my business rule
Running unit tests
Command line
To run unit test, you can run Maven command : mvn verify.
You can also run only one class of unit test, by adding -Dit.test parameter to your maven command.
mvn -Dit.test=DummyTest verify
IntelliJ
Running test classes in IntelliJ requires some additional configuration.
Indeed, when tests are run using a Maven command such as mvn verify, the test classes are executed with the configuration coming from the Maven properties that are defined in your pom.xml or your settings.xml file.
But when the test classes are run from IntelliJ, the test runner is not aware of the Maven configuration. It has to be manually added to the IntelliJ JUnit configuration.
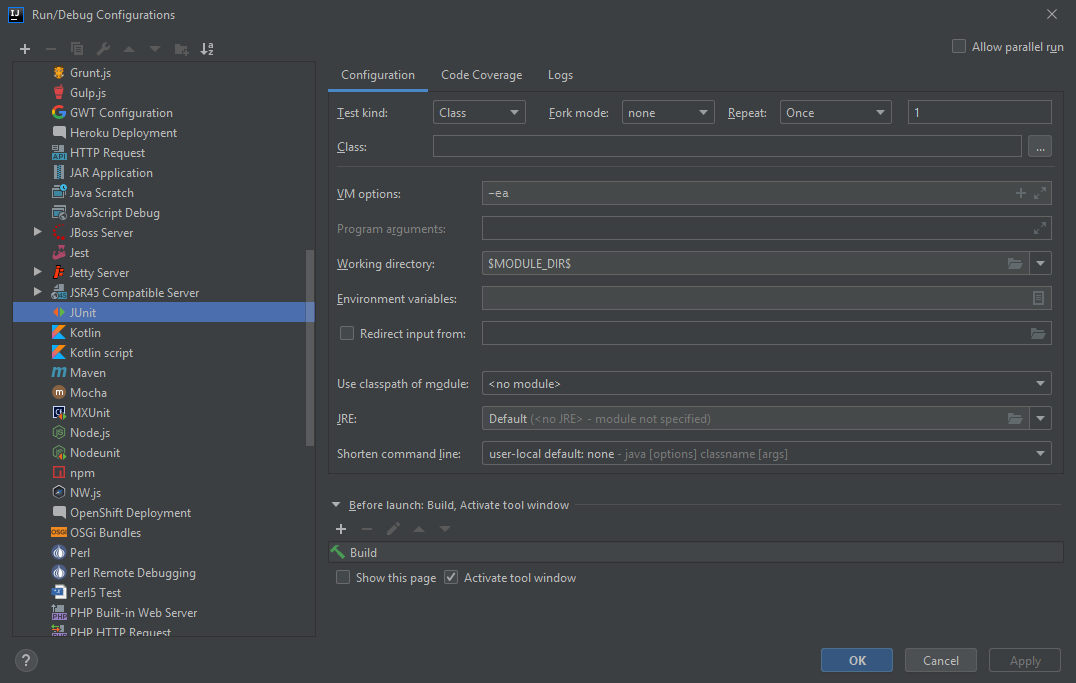
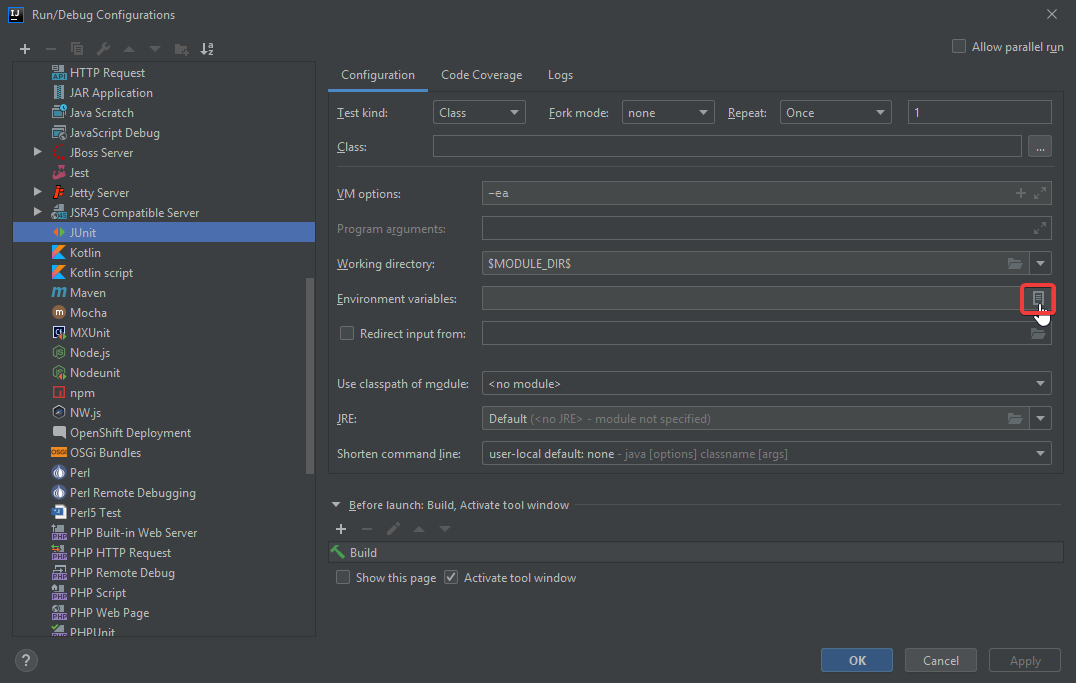
To avoid having to configure it for each test class, you can edit the default JUnit configuration template for your project. The steps are the following :
Click on Run / Edit Configurations
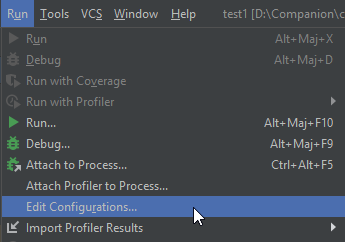
Navigate to Templates / JUnit
Click the "Browse" icon on the "Environment variable" line
- Add the following environment variables
- step.url : The URL of the STEP environment where your tests should be executed
- step.username : The username to connect to the STEP environment
- step.password : The password to connect to the STEP environment
- step.context : The context in which to execute the test BR
- step.workspace : The workspace in which to execute the test BR. Usually "Main"
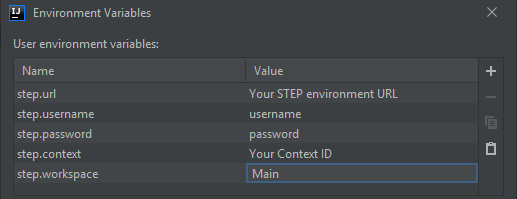
- Click "Apply" then "OK"
- Add the following environment variables
Companion Tests Helpers
Getting started
Companion Test Helpers is a suite of three libraries that make testing business rules easier and more efficient.
- Companion Test Matchers provides Jasmine custom matchers.
- Companion Test Mocks provides useful mocks for business rules bindings.
- Companion Test Records provides a human friendly way to instantiate data to run test with.
To use it:
- You have to include the following dependency in your project dependencies :
<dependency>
  <groupId>fr.cantor.companion.ext</groupId>
  <artifactId>companion-test-helpers</artifactId>
  <version>1.2.0</version>
</dependency>
- In your Java test file, add the following annotation(s):
// if you want to use all three libs
@IncludeCompanionTestHelpers

// to use only one or two libs
@InlucdeCompanionTestMatchers
@InlcudeCompanionTestMocks
@IncludeCompanionTestRecords
- When using companionTestMatchers, in your
spec.jsfile add custom matchers to Jasmine matchers. It has to be added inside a Jasmine beforeAll
describe("tests", function () {
    beforeAll(function () {
        jasmine.addMatchers(companionTestMatchers);
    })

    it("should work", function (){
        //check if node name is "my node"
        expect(node).toHaveName("my node");
    });
});
Companion Test Matchers
This documentation provides an overview of the custom matchers available with Companion Custom Matchers. These matchers enhance testing capabilities by allowing you to perform specialized checks on various types of objects from Step API.
- Node Matchers
- Workflowable Node Matchers
- Task Matchers
- Workflow Instance Matchers
- Workspace Aware Revisable Node Matchers
- Trigger Result Matchers
- Array Matchers
Node Matchers
| Matcher | Description |
|---|---|
toHaveName(expected: string): boolean | Check if a node has the expected name.expected: Expected name for the given node. |
toHaveEmptyName(): boolean | Check if a node has an empty name. |
toHaveSimpleValue(expected: { attributeId: string, value: string }): boolean | Check if a node has a simple value for the specified attribute.expected: Object containing attributeId and value properties. |
toHaveLOVValueId(expected: { attributeId: string, lovId: string, id?: string }): boolean | Check if a node has a LOV (List of Values) value for the specified attribute.expected: Object containing attributeId, lovId, and optionally id properties. |
toHaveEmptyValue(expected: string): boolean | Check if a node has an empty value for the specified attribute.expected: Attribute ID to be checked. |
toHaveValues(expected: { attributeId: string, values: string[] }): boolean | Check if a node has the expected values for a multi-values attribute.expected: Object containing attributeId and values array. |
toHaveLOVValuesId(expected: { attributeId: string, valuesId: string[] }): boolean | Check if a node has LOV (List of Values) values for a LOV multi-values attribute.expected: Object containing attributeId and valuesId array. |
toHaveClassifications(expected: { classificationsIds: string[], linkTypeId?: string }) | Check if a product or entity has the expected classifications.expected: Object containing classificationsIds array and optional linkTypeId for products. |
toHaveChildren(expected: string[]) | Check if a product, entity, or classification has the expected children.expected: Array of expected children IDs. |
toHaveReference(expected: { typeId: string, target: com.stibo.core.domain.ReferenceTarget }) | Check if a reference source has a reference for the expected reference type ID and target.expected: Object containing typeId and target properties. |
Workflowable Node Matchers
| Matcher | Description |
|---|---|
toBeInState(expected: com.stibo.core.domain.state.State | { workflowId: string, stateId: string }): boolean | Check if a workflowable node is in the expected state of a workflow.expected: A State object or an object containing workflowId and stateId. |
toBeInWorkflow(expected: com.stibo.core.domain.state.Workflow | string): boolean | Check if a workflowable node is in the expected workflow.expected: A Workflow object or a workflow ID as a string. |
toHaveWorkflowValue(expected: { workflowId: string, variableId: string, value: string }): boolean | Check if a workflowable node has the expected value for the specified workflow variable.expected: Object containing workflowId, variableId, and value. |
Task Matchers
| Matcher | Description |
|---|---|
toBeAssignedTo(expected: string): boolean | Check if a task is assigned to the expected user.expected: Expected user ID. |
Workflow Instance Matchers
| Matcher | Description |
|---|---|
toHaveSimpleVariable(expected: { variableId: string, value: string }) | Check if a workflow instance has the expected value for the specified workflow variable.expected: Object containing variableId and value. |
toHaveEmptyVariable(expected: string): boolean | Check if a workflow instance has an empty value for the specified workflow variable.expected: Workflow variable ID. |
Workspace Aware Revisable Node Matchers
| Matcher | Description |
|---|---|
toBeApproved(): boolean | Check if a workspace-aware revisable node is approved. |
Trigger Result Matchers
| Matcher | Description |
|---|---|
toBeRejected(): boolean | Check if a trigger result is rejected. |
toBeRejectedWithMessage(message: string): boolean | Check if a trigger result is rejected with the specified message. |
Array Matchers
| Matcher | Description |
|---|---|
toBeSameArrayAs(expected: any[]) | Check if the given array is the same as the expected array.expected: Expected array. |
Companion Test Mocks
Introduced in 5.5.0, this documentation provides an overview on available mocks
| Mock | Description |
|---|---|
new MockWebUIContext(screenID: string, selection: Node[]) | Mocks the WebUIContext class screenID: the current webUI screen selection: an array of Node that should be selected |
new MockDerivedEvent(id: string) | Mocks the DerivedEventType class id: the id of the derivedEvent |
new MockEventQueue() | Mocks the EventQueue class |
new MockLookupTableHome(lookupTables: Object.<string, Object.<string, string>) | Mocks the LookupTableHome class lookupTables: an object of objects, the first level of keys depict the asset ids of the lookupTable, the seconde level the from column |
new MockBusinessAction(companionBusinessRule: function) | Mock the BusinessAction class companionBusinessRule: the dummy function to call when the business action is executed |
new MockManager(manager: com.stibo.core.domain.Manager) | Mock the Manager class, needed in rollback context as some Homes aren't correctly loaded manager: the actual manager |
Companion Test Records
Introduced in 5.5.0, records are a way of create data in a readable format.
Record
A Record is an object with a defined set of keys used to describe a Node to be created.
It can represent an Asset, a Classification, a DataContainer, an Entity, or a Product, and will be processed using createAssets, createClassifications, createDataContainers, createEntities or createProducts respectively.
Each function takes the parent node as its first argument, a RecordMap as its second, and hooks as an optional third argument.
| Key | Node types | Description |
|---|---|---|
| assets | Classification | RecordMap representing asset |
| attributes | All | An object of ValueRecord representing attribute values |
| children | Classification, Entity, Product | RecordMap representing child nodes |
| classificationLinks | Product | Array of ClassificationLinkRecord |
| dataContainers | Entity, Product | RecordMap representing DataContainers |
| id | All | String to set the id of the node |
| name | Asset, Classification, Entity, Product | String to set the name of the node |
| references | All | Array of ReferenceRecord |
| slug | All | String allows to retrieved the node with the getNode method once it has been created, or to reference the node with the targetSlug (see classificationLinks or references) |
attributes
An object where each key is an attribute ID, and each value is a ValueRecord object. There are four types of ValueRecord, depending on whether the attribute is multivalued and whether it uses a List of Values (LOV):
"attributes": {
	"ATD_SINGLE_VALUE": {"value": "SingleValue"},
	"ATD_SINGLE_LOV": {"id": "LOVValueID"},
	"ATD_MULTI_VALUE": {"values": [
		{"value": "SingleValue1"},
		{"value": "SingleValue2"}
	]},
	"ATD_MULTI_LOV": {"values": [
		{"id": "LOVValueID1"},
		{"id": "LOVValueID2"}
	]}
}
A ValueRecord can also take a unit as argument like so:
"attributes": {
	"ATD_SINGLE_VALUE": {"id": string, "unit": com.stibo.core.domain.Unit}
}
classificationLinks
An array for which each entry is an object expecting at least two keys, typeId to set the classificationLink type and another to define the reference target:
target: the target itselftargetSlug: a slug define somewhere else in the record to reference the object that will be createdtargetId: the id of the target, if the object already exist within the step instance
"classificationLinks": [
	{"typeId": "REF_ID", "target": objetCible},
	{"typeId": "REF_ID", "targetSlug": "slug"},
	{"typeId": "REF_ID", "targetId": "OBJECT_ID"}
]
references
An array in which each entry is an object requiring at least two keys: typeId, to specify the reference type, and one of the following to define the reference target:
target: the target object itselftargetSlug: a slug defined elsewhere in the Record, referencing an object that will be createdtargetId: the ID of the target, if the object already exists in the STEP instance
"references": [
	{"typeId": "REF_ID", "target": objetCible},
	{"typeId": "REF_ID", "targetSlug": "slug"},
	{"typeId": "REF_ID", "targetId": "OBJECT_ID"}
]
You can define reference metadata using the attributes
"references": [{
  "typeId": "REF_ID",
  "targetId": "someId",
  "attributes": {MY_ATTRIBUTE: {"value": "my value"}}
}]
This illustrates a full Product Record definition:
const record = {
    name: "Some Product Name",
    attributes: {
        "ATD_SINGLE_VALUE": {value: "single value"}
    },
    classificationLinks: [
        {typeId: "TO_CLS_REF_ID", targetId: "existing-classification-id"},
    ],
    references: [
        {typeId: "TO_NODE_REF", targetId: "existing-node-id"}
    ],
    dataContainers: {
        DC_TYPE_ID: [
            {attributes: {"ATD_DC": {id: "some-lov-id-1"}}},
            {attributes: {"ATD_DC": {id: "some-lov-id-2"}}}
        ]
    },
    children: {
        "CHILD_ID": {
            name: "Some Child Name",
            attributes: {"ATD_MULTI_VALUE": {
                "values": [{"value": "SingleValue1"}, {"value": "SingleValue2"}]
            }}
        },
    }
};
RecordMap
A RecordMap is an object where each key is an object type ID, and each value is an array of Records. This structure is used to define:
- Assets stored under a classification using the key
assets. - Children of a classification, entity or product using the key
children. - DataContainers of an entity or a product using the key
dataContainers.
{
    "MY_OBJECT_TYPE": [{/* some record */}, {/* some record */}]
}
How to use Records?
There is several ways to instantiate data with records,
createAssets(classification, recordMap, [hooks])createEntities(parent, recordMap, [hooks])createDataContainers(node, recordMap, [hooks])createProducts(parent, recordMap, [hooks])createObject(parent, recordMap, type, [hooks])
type can be equals to "asset", "classification", "dataContainer", "entity", "product".
Multiple type of object can be created with only one call using the createBranches function
giving you the capacity to use targetSlug across different RecordMap.
createBranches takes as argument:
managerrootRecords: an array of special records that have the particularity to reference an existing node in the target step instance with theidkey
createBranches(manager, [
    {
        id: "existing-entity",
        dataContainers: {
            MY_DATACONTAINER_TYPE: [
                {
                    references: [{typeId: "MY_DC_TO_PRODUCT_REF", targetSlug: "my-product"}]
                }
            ]
        }
    },
    {
        id: "existing-product",
        children: {
            MY_PRODUCT_TYPE: [
                {
                    slug: "my-product",
                    /* ... some record definition */
                }
            ]
        }
    }
]);
Hooks
Hooks allow you to execute code in the RecordMap creation cycle.
It is an optional argument for createAssets, createBranches, createDataContainers, createEntities, createProducts and createObjects
They are six types of hooks:
beforeBranches(rootRecords[], com.stibo.core.domain.Manager)
Only available withcreateBranches.
Allow you to alter the array ofrootRecord, or performing some kind of verification.beforeAll(RecordMap, com.stibo.core.domain.Manager)
Allow you to alter the recordMap before any object is created.SOME_OBJECT_TYPE.before(ObjectRecord, ObjectTypeID, com.stibo.core.domain.Manager)
Allow you to alter a record of a related object type just before its creation.SOME_OBJECT_TYPE.after(Node, ObjectRecord, ObjectTypeID)
Allow you to perform some action right after the creation of an object.afterAll(ObjectTree, RecordMap)
Allow you to perform some actions after all object of a recordMap are created.afterBranches(ObjectTree[], ObjectTree)
Only available withcreateBranches.
Allow you to perform some actions after all the objects defined in allrootRecordare created.
createBranches(
	manager,
	[
        {
            id: "some-product",
            children: {MY_PRODUCT_TYPE: [{/* record */}]}
        }
    ],
	{
        beforeBranches: (rootRecords, manager) => {
            rootRecords.unshift({
                id: "some-classification",
                assets: {MY_ASSET_TYPE: [{slug: "my-asset"}]}
            });
        },
        MY_PRODUCT_TYPE: {
            before: (record, objectTypeId, manager) => {
                record.references = [{typeId: "REF_TO_ASSET", targetSlug: "my-asset"}];
            },
            after: (product, record, objectType) => {
                BA_SOME_ACTION(node, manager, logger);
            }
        }
    }
);
How to retrieve created objects?
createAssets, createDataContainers, createEntities, createProducts and createObjects all retrieve the created nodes within a structure called the ObjectTree.
For the following record:
const record = {
    MY_PRODUCT_TYPE: [{
        slug: "my-slug",
        children: {
            MY_CHILD_TYPE: [
                {slug: "my-child-slug"}
            ]
        },
        dataContainers: {
            MY_DATACONAINER_TYPE: [
                {attributes: {ATD_SIMPLE_VALUE: {value: "row1"}}},
                {attributes: {ATD_SIMPLE_VALUE: {value: "row2"}}}
            ]
        },
    }]
};

const objectTree = createProducts("my-parent", record);

logger.info(JSON.stringify(objectTree, objectNodeToJSON, 4));
The ObjectTree will look like this:
{
    "MY_PRODUCT_TYPE": [
        {
            "object": "com.stibo.core.domain.Product",
            "slug": "my-slug",
            "children": {"MY_CHILD_TYPE": [
                {
                    "object": "com.stibo.core.domain.Product",
                    "slug": "my-child-slug"
                }
            ]},
            "dataContainers": {"MY_DATACONAINER_TYPE": [
                {"object": "com.stibo.core.domain.datacontainer.MultiDataContainer"},
                {"object": "com.stibo.core.domain.datacontainer.MultiDataContainer"}
            ]}
        }
    ],
    "unlinkedTargetSlug": {
        "references": [],
        "classificationLinks": []
    }
}
Meaning the created node can be access with objectTree.MY_PRODUCT_TYPE[0].object.
The getNode methode is also made available in order to retrieve the node. It takes a node slug as a parameter.
const myProduct = objectTree.getNode("my-slug");
const myChildProduct = objectTree.getNode("my-child-slug");
logger.info(myProduct) // com.stibo.core.domain.Product
logger.info(myChildProduct) // com.stibo.core.domain.Product
createBranches will retrieve the same data structure within an array.
In both cases the method getNode is available.
const objectTrees = createBranches(manager, [
    {id: "parent-classification", children: {MY_CLASSIFICATION_TYPE: [{slug: "my-classification"}]}},
    {id: "parent-entity", children: {MY_ENTITY_TYPE: [{slug: "my-entity"}]}},
]);
const classification = objectTrees.getNode("my-classification");
const entity = objectTrees.getNode("my-entity");
logger.info(classification); // com.stibo.core.domain.Classification
logger.info(entity); // com.stibo.core.domain.entity.Entity
TargetSlug
To create a reference to a node that is created within the same call, you can use the targetSlug key.
const objectTree = createProducts(parent, {
    PRODUCT_TYPE_A: [{
        slug: "my-product-a"
    }],
    PRODUCT_TYPE_B: [{
        slug: "my-product-b",
        references: [
            {typeId: "REF_TO_SIBLING", targetSlug: "my-product-a"},
            {typeId: "REF_TO_SIBLING", targetSlug: "unused-slug"}
        ]
    }],
});

const myProductA = objectTree.getNode("my-product-a");
const myProductB = objectTree.getNode("my-product-b");

expect(myProductB).toHaveReference({typeId: "REF_TO_SIBLING", target: myProductA}); // true
Note that in the previous example, a targetSlug references a node that hasn't been declared yet.
In such cases, the ObjectTree can be inspected to ensure that all references or classificationLinks have been created.
{
  "PRODUCT_TYPE_A": [{"object": "com.stibo.core.domain.Product", "slug": "my-product-a"}],
  "PRODUCT_TYPE_B": [{"object": "com.stibo.core.domain.Product", "slug": "my-product-b"}],
  "unlinkedTargetSlug": {
    "references": [
      {
        "src": "com.stibo.core.domain.Product",
        "linkRecord": {"typeId": "REF_TO_SIBLING", "targetSlug": "unused-slug"}
      }
    ],
    "classificationLinks": []
  }
}
Print records and objectTrees
To transform a RecordMap or an ObjectTree into string, two replacer are made available.
recordToJSONto transformRecordMapobjectNodeToJSONto transformObjectTree
JSON.stringify(record, recordToJSON, 4);
JSON.stringify(objectTree, objectNodeToJSON, 4);
Other functions
The Record API also gives access to helpers functions that all uses the same notation as Records.
| name | description | example |
|---|---|---|
| setValues | Set attribute values for a given node | setValues(myProduct, {"ATD_VALUE": {value: "value"}}) |
| createReference | Create a reference for a given node | createReference(myProduct, {typeId: "REF_TYPE_ID", targetId: "node-id"}) |
| createClassificationLink | Create e classificationLink for a given node | createClassificationLinks(myProduct, {typeId: "REF_TYPE_ID", targetId: "classif-id"}) |