
Sheet to Xml
Sheet to Xml is a Cantor function that transforms Excel or CSV files into an XML file using a header system
This function takes as input all .companion.csv, .companion.xlsx and .companion.xlsm files in a Companion for Delivery project and translates them into the StepXML language as *.step.xml files.
A Sheet to Xml ready Excel or CSV file is composed of two sections : the header section and the data section. Both sections must be separated by an empty row.
Here is an example of a CSV file that can be used by Sheet to XML :
<AttributeList;;>
<Attribute;;>
ID;<Name>;ProductMode
;;
AT_Actif;Actif/Inactif;Property
This file will be transformed in Xml :
<AttributeList>
    <Attribute ID="AT_Actif" ProductMode="Property">
        <Name>Actif/Inactif</Name>
    </Attribute>
</AttributeList>
Header Section
The header section defines the Xml templating and determines how the data section is rendered into the target StepXML file.
Each new row defines a sub-element (tag or attribute) of the previous row :
- To define two sibling tags, you put them on the same row in two different cells.
- To define a child tag, you put the child tag on a new row in the cell beside the parent tag
- To define multiple children sub-elements, you merge parent tag on multiple column
Since version 5.0.0 of Companion for Delivery it is now possible to set attribute values in your xml header tags
TIP
To merge cells in CSV, you should start your tag in a cell and close your tag in another cell.
Example : <AttributeList;;;;>
WARNING
On the first row you can only have one Xml tag.
Examples
Sibling tag
Source file :
- CSV :
<AttributeList;;;>
<Attribute;;;>
ID;<Name>;ProductMode;<AttributeGroupLink>
- Xlsx :

Result header :
<AttributeList>
    <Attribute ID="" ProductMode="">
        <Name></Name>
        <AttributeGroupLink></AttributeGroupLink>
    </Attribute>
</AttributeList>
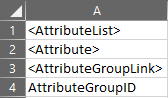
Child tag
Source file :
- CSV :
<AttributeList>
<Attribute>
<AttributeGroupLink>
AttributeGroupID
- Xlsx :
Result header :
<AttributeList>
    <Attribute>
        <AttributeGroupLink AttributeGroupID=""></AttributeGroupLink>
    </Attribute>
</AttributeList>
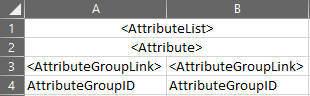
Multiple children tags
Source file :
- CSV :
<AttributeList;>
<Attribute;>
<AttributeGroupLink>;<AttributeGroupLink>
AttributeGroupID;AttributeGroupID
- Xlsx :
Result header :
<AttributeList>
    <Attribute>
        <AttributeGroupLink AttributeGroupID=""></AttributeGroupLink>
        <AttributeGroupLink AttributeGroupID=""></AttributeGroupLink>
    </Attribute>
</AttributeList>
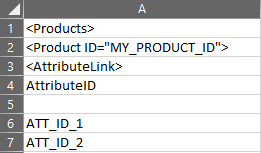
Attribute value in tag
Source file :
- CSV :
<Products>
"<Product ID=""MY_PRODUCT_ID"">"
<AttributeLink>
AttributeID

ATT_ID_1
ATT_ID_2
- Xlsx :
Result header :
<Products>
    <Product ID="MY_PRODUCT_ID">
        <AttributeLink AttributeID="ATT_ID_1"/>
        <AttributeLink AttributeID="ATT_ID_2"/>
    </Product>
</Products>
Companion for Delivery custom elements
Companion for Delivery custom elements are Xml elements that can be put in CSV or Excel files to simplify integration of complex data
companion:Type
Replace ProductMode Xml attributes in Attribute tag.
This element allows to use Description or Specification values instead of Property and Normal values.
Example CSV file :
<AttributeList;;>
<Attribute;;>
ID;<Name>;companion:Type
;;
AT_DescriptionAttribute;Description Attribute;Description
AT_SpecificationAttribute;Specification Attribute;Specification
Result file :
<AttributeList>
    <Attribute ID="AT_DescriptionAttribute" ProductMode="Property">
        <Name>Description Attribute</Name>
    </Attribute>
    <Attribute ID="AT_SpecificationAttribute" ProductMode="Normal">
        <Name>Specification Attribute</Name>
    </Attribute>
</AttributeList>
companion:IconFile
Add icon for UserType content inside StepXML from relative path with Companion for Delivery file.
Example :
For this tree
step-datamodel/
├─── src/main/step/com/step/companion
|    ├─── icons
|    |     └─── ProductImage.png
|    └─── UserTypes.companion.csv
└─── pom.xml
CSV file :
<UserTypes;;>
<UserType;;>
ID;<Name>;<companion:IconFile>
;;
P_PRODUCT;Produit;icons/ProductImage.png
Result file :
<UserTypes>
    <UserType ID="P_PRODUCT">
        <Name>Produit</Name>
        <Icon>H4sIAAAAAAAAAHP3dLOwTBRgEGC4asawePHiOXPmrFq16vTp0/v371+4cOHy5ctnzJhx4MCBU6dOHTx48OTJk4sWLTp+/Pjs2bNXrFixZ8+eJUuWzJ07d/A...</Icon>
    </UserType>
</UserTypes>
companion:ConfigurationFile
Add configuration file for ImportConfiguration and ExportConfiguration content inside StepXML from relative path with Companion for Delivery file.
Example :
For this tree
step-tree/
├─── src/main/step/com/step/companion
|    ├─── importConfig
|    |     └─── Import_config1.xml
|    └─── ImportConfiguration.companion.csv
└─── pom.xml
CSV file :
<ImportConfigurations;;>
<ImportConfiguration;;>
ID;<Name>;<companion:ConfigurationFile>
;;
Import_Config1;Configuration d'import 1;importConfig/Import_config1.xml
Result file :
<ImportConfigurations>
    <ImportConfiguration ID="P_PRODUCT">
        <Name>Produit</Name>
        <Configuration>H4sIAAAAAAAAAOVWW2/TMBR+36+I/A5lk3hLO2VJu0VLmiqXTXuyTHLaGhI72A6j/56TxB0dLTABQkj0KefyfT6XL07wcIqIOJhm4LMJ...</Configuration>
    </ImportConfiguration>
</ImportConfigurations>
companion:AssetBinaryContent
Add asset binary content inside StepXML from relative path with Companion for Delivery file.
Example for this tree:
step-integration/
├─── src/main/step/com/step/companion
|    ├─── AssetFiles
|    |     └─── images.jpeg
|    └─── Assets.companion.csv
└─── pom.xml
Csv file :
<Assets;;;>
<Asset;;;>
ID;<ClassificationReference>;UserTypeID;<companion:AssetBinaryContent>
"";ClassificationID;;
"";;;
assetID;assetParentID;Image;AssetFiles/images.jpeg
WARNING
This is only supported by Step 9.3+
Comments
It is possible to add comment in CSV and XLSX files to ignore information during Companion compilation. Sheets that are hidden are automatically ignored.
Sheet
To comment a sheet, you need to add # at the beginning of the sheet name.
Column
To comment a column, you need to prefix the cell value by # at the same row level of the previous Companion column tag. Make sure that below that commented column Companion tag cells are empty until the data begin. See following examples :
Example 1
<AttributeList;;;>
<Attribute;;;>
ID;<Name>;ProductMode;#Type Step
;;;
AT_Desc;Description;Property;Description
AT_Spec;Specification;Normal;Specification
In that example, Companion ignores column 4 during compilation. It is very useful for instance when you want to add a comment / description or calculated fields for users.
This file will be transformed in Xml :
<AttributeList>
    <Attribute ID="AT_Desc" ProductMode="Property">
        <Name>Description</Name>
    </Attribute>
    <Attribute ID="AT_Spec" ProductMode="Normal">
        <Name>Specification</Name>
    </Attribute>
</AttributeList>
Example 2
<AttributeList;;;;;;>
<Attribute;;;;;;>
ID;<Name>;Multivalued;companion:Type;Mandatory;<UserTypeLink>;# Description
;;;;;UserTypeID;
;;;;;;
AT_Desc;Description;true;Description;true;MY_USERTYPE;This is an example attribute for column comments
In that example, Companion ignores column 7 during compilation. You need to get rid of all the values in the cells below this commented column until you separate it from the data for this to work.
This file will be transformed in Xml :
<AttributeList>
    <Attribute ID="AT_Desc" Mandatory="true" MultiValued="true" ProductMode="Property">
        <Name>Description</Name>
        <UserTypeLink UserTypeID="MY_USERTYPE"/>
    </Attribute>
</AttributeList>
Row
To comment a row, you need to add // at the beginning of the row.
Example
<AttributeList;;>
<Attribute;;>
ID;<Name>;ProductMode
;;
AT_Actif;Actif/Inactif;Property
//This is a comment;;
//AT_COMMENTED;Commented;
This file will be transformed in Xml :
<AttributeList>
    <Attribute ID="AT_Actif" ProductMode="Property">
        <Name>Actif/Inactif</Name>
    </Attribute>
</AttributeList>
Validation
When Companion for Delivery transform .companion.csv, .companion.xlsx and .companion.xlsm to .step.xml there is a validation of the generated file with StepXML XSD.
This validation will check that all the fields are well written and all mandatory fields are completed.