
Companion for Integration - Validation
Companion for Integration - Validation provides a sandbox for testing C4I configuration files against a STEP XML export, without installing C4I on your computer. Upload or edit your inputs, run the configuration, then inspect the resulting database records or download the generated files.
Access
Open C4I Validation and sign in with your account.
Login controls
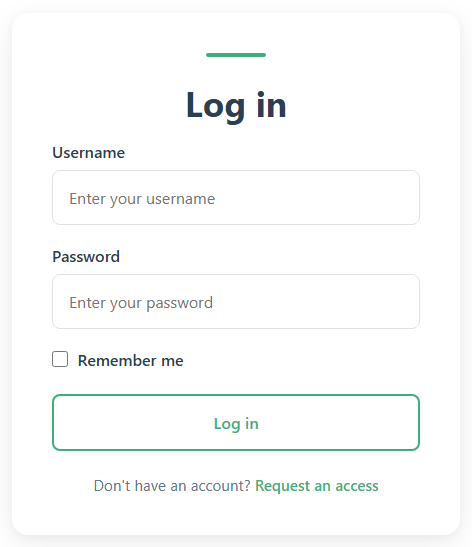
Select a number for its instructions.
To request an account, select Request an access. Enter your first name, last name, email address and company. Select Companion customer if it applies; otherwise, you can add optional Details. Then select Submit. Account request received confirms the request, not account creation. Wait to be contacted with access details.
Try a demo
The Choose a demo scenario menu loads matching configuration, StepXML and Excel templates. It replaces the current inputs and template selection, so copy any edited text you want to keep into local files before selecting a demo. After sign-in, Demo 1 loads with MySQL selected and runs automatically.
- Keep Demo 1 for a simple product mapping. Demo 2 demonstrates values serialized as JSON; Demo 3 provides another product-mapping example with three products; Demo 4 includes two Excel templates.
- Select a destination tab in the results panel.
- Review the results. With Demo 1, MySQL produces two product rows and MongoDB produces two documents, for Test Product and Test Product 2.
To use your own templates, see Excel templates.
Upload your configuration and data
Use the numbered controls below to upload or edit your inputs, choose a destination and run the configuration.
Workspace controls
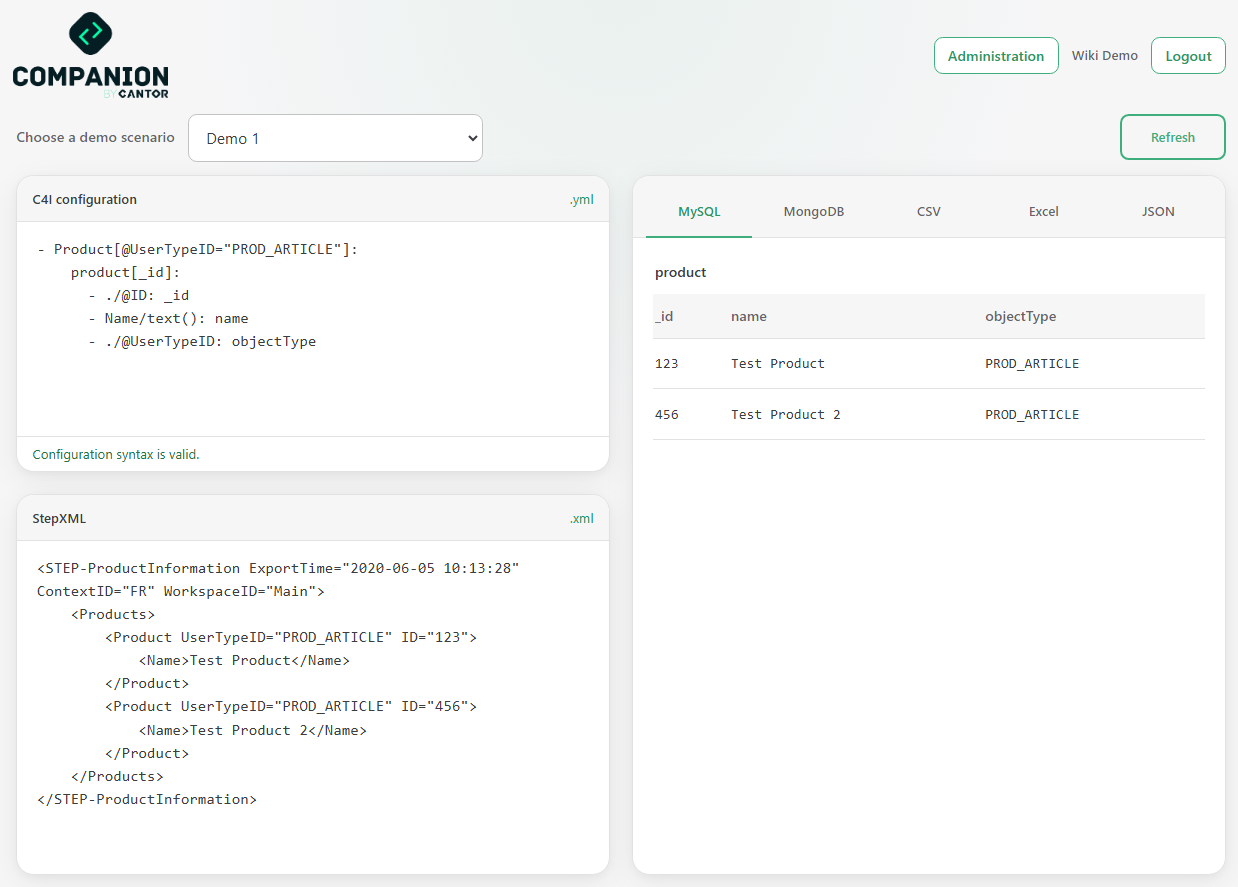
Select a number for its instructions.
- 1C4I configuration: Paste or edit your YAML here. Click the C4I configuration heading above the editor to upload a .yml or .yaml file.
- 2StepXML: Paste or edit your STEP XML here. Click the StepXML heading above the editor to upload an XML file.
- 3Destination tabs: Choose MySQL, MongoDB, CSV, Excel or JSON. The results appear in the panel below.
- 4Refresh: Run the configuration again after editing either input.
- 5Configuration syntax status: Shows whether the configuration syntax is valid.
For help writing YAML mappings, see the configuration principles and syntax reference. Use a small STEP export containing the products, attributes and values selected by your configuration.
Check configuration syntax
The configuration's syntax is checked after a short pause while you edit it, and when you upload it or load a demo. Read the status beneath the configuration editor.
Diagnostics identify the relevant YAML line and explain invalid YAML or XPath expressions. Nonblocking suggestions highlight likely case-sensitive attribute mistakes, such as @UserTypeId instead of @UserTypeID, or @AttributeId instead of @AttributeID. A suggestion calls for review; it does not necessarily make the configuration invalid.
Syntax checks and execution
Passing the syntax check does not guarantee successful execution or the expected results.
Choose a destination and run
Choose a destination using the tabs marked 3 in the workspace screenshot. The results panel is to the right of the editors on a wide window or below them on a narrow window. The service runs C4I against its test destinations; you do not need to enter database connection details on this page.
| Destination | Result |
|---|---|
| MySQL | A plain table for each generated result, with column names and rows. |
| MongoDB | Collections with document counts, expandable document fields and a Copy as JSON action. |
| CSV | A ZIP archive containing the generated CSV files. |
| JSON | A ZIP archive containing the generated JSON files. |
| Excel | Individual downloads for the generated Excel files. |
Select Refresh, marked 4 in the workspace screenshot, after typing or pasting changes. The button displays Loading... while the request is running; results or error details appear in the results panel.
Uploading either input, loading a demo, changing the destination, or uploading or clearing Excel templates can automatically run the configuration when both inputs and a destination are present.
Inspect results and download files
MySQL
Each generated table is shown separately, with its column names and result rows.
Reading MySQL results
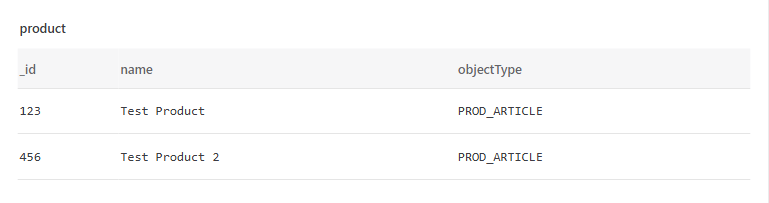
Select a number for its instructions.
MongoDB
Each generated collection shows its name and document count above a table with Field, Value and Type columns.
Reading MongoDB results
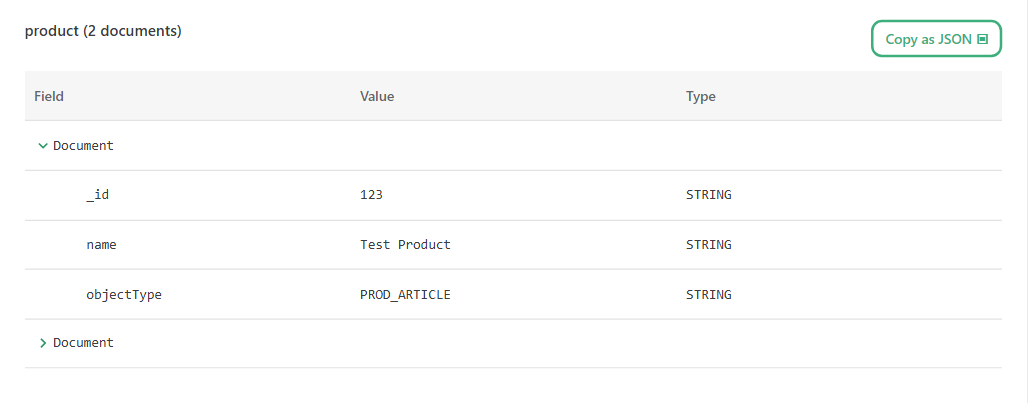
Select a number for its instructions.
- 1Collection and count: Check the collection name and the number of generated documents.
- 2Copy as JSON: Copy the full collection, including documents that are collapsed.
- 3Expand or collapse: Select the arrow beside Document to show or hide its fields. Nested fields can also be expanded.
- 4Document fields: Read each field alongside its value and BSON type.
For exact document structure and BSON values, use Copy as JSON. It preserves type information in MongoDB's Extended JSON format; dates displayed in the table use your browser's locale.
CSV, JSON and Excel
After a successful CSV or JSON run, select Download as CSV or Download as JSON. These buttons download a ZIP archive, even when the result contains only one file.
For a single generated Excel file, select Download as Excel. If several files are generated, select the download button labelled with the filename you want.
Excel templates
Select Excel to reveal the Excel template area below the input editors. Templates are optional; demos include sample templates. You can upload several .xlsx, .xltx, .xls or .xlt files together. Avoid empty files and duplicate filenames.
Excel template and download controls
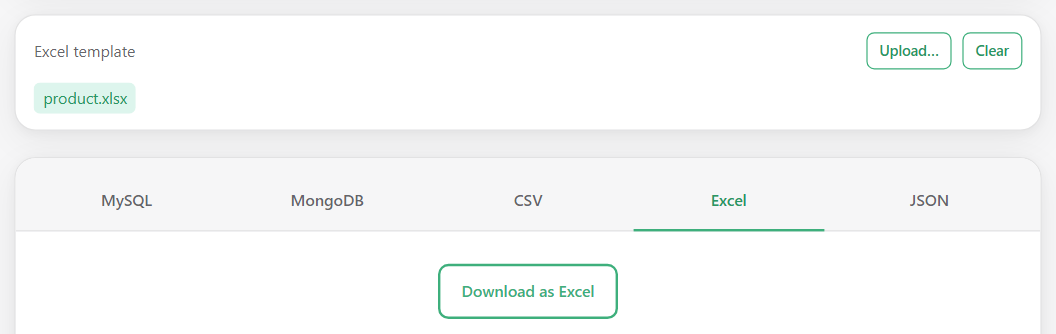
Select a number for its instructions.
- 1Excel destination: Select the Excel tab to work with templates and generate Excel files.
- 2Upload or Clear: Select Upload… to choose template files, or Clear to remove the selection. A new upload replaces the selected template set.
- 3Selected templates: Check the filenames here. Demo 1 includes product.xlsx.
- 4Download as Excel: Download each generated Excel file.
This detail uses the app's narrow-window layout to show the related controls together. On a wide window, the template area is on the left and the download is on the right.
Match the template filename, without its extension, to the destination name in your YAML. For example, use product.xlsx for the product destination in Demo 1; that demo already includes the matching template. A destination such as product/Sheet1[_id] targets a sheet within that file. Template headers and formatting control how the generated data is laid out; see Excel templating for examples.
Limits and errors
The limits below are defaults and may differ on your instance.
Configuration and StepXML are each limited to 1,000,000 characters. For a large STEP export, select fewer products or export a smaller sample.
Excel template limits are 50 templates, approximately 47.7 MiB per template and 190.7 MiB in total.
If a run succeeds but produces no results, check that your mappings and filters match records in the StepXML sample.
For a persistent C4I error or Internal server error, contact Cantor with the error details and any displayed error identifier.